Set up Wi-Fi on Linux – Ubuntu, NetworkManager, wpa_supplicant
Ubuntu, NetworkManager
When using a GUI, it is likely that you use NetworkManager for network configuration.
- Run command
nm-connection-editor(Advanced Network Configuration). - Expand the Wi-Fi category and look if you already have an existing Sincoolka profile - it might be a good idea to remove it with a - button (minus sign) if it does not work.

- Then, click the + button (plus sign) in the bottom toolbar.
- In the Choose a Connection Type window, pick Wi-Fi from the list. Then click the Create… button

- A window for describing network configuration will open.
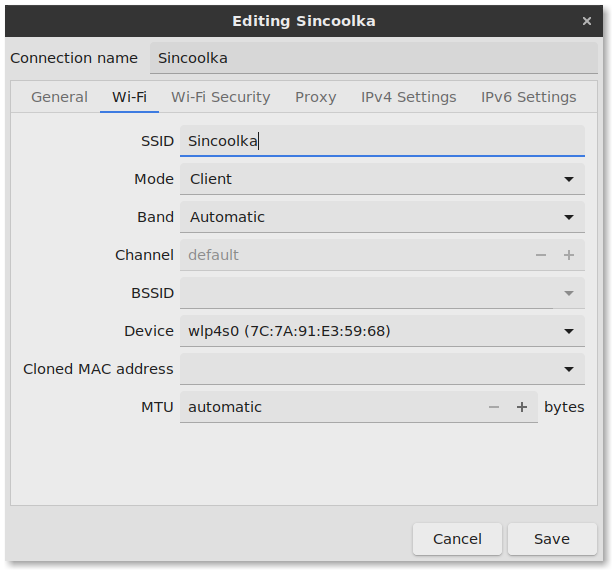
- Fill out the name of the profile (can be anything, e.g. Sincoolka).
- Switch to the Wi-Fi tab and fill out these - SSID:
SincoolkaorSincoolka 5G. From the Devices list, choose your Wi-Fi adapter.
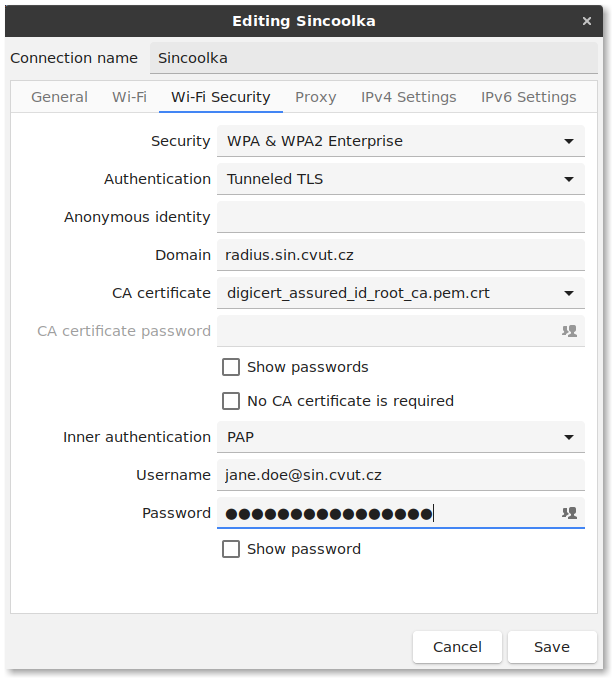
- Switch to the Wi-Fi Security tab and set up the following:
- Security: WPA2-Enterprise
- Authentication: Tunneled TLS
- Anonymous identity:
anonymous@sin.cvut.cz - Domain:
radius.sin.cvut.cz - CA certificate: either browse to
/etc/ssl/certs/Hellenic_Academic_and_Research_Institutions_RootCA_2015.pem, or download and save it (download format PEM) - Inner authentication: PAP
- Username: use your SIN username or SIN email (find it after logging in to SINIS)
- Password: the same as for your SINIS login.
- Confirm your settings by pushing the Save button.
Now, your connection should be all set for secure Wi-Fi browsing.
wpa_supplicant
WPA Supplicant is an utility which enables WPA security support for Wi-Fi in Linux. NetworkManager uses wpa_supplicant internally.
In case you want to set up a wpa_supplicant profile manually, we have prepared a Sincoolka network definition below.
To properly verify that you are using our server, the CA certificate is necessary. It should be already on your system at path /etc/ssl/certs/Hellenic_Academic_and_Research_Institutions_RootCA_2015.pem, so this configuration will use that. If you don't have it there, you may download it from us and save it. You will then enter the path to this file in the wpa_supplicant configuration profile.
- wpa_supplicant.conf
network={
    ssid="Sincoolka"  # or Sincoolka 5G
    scan_ssid=1
    key_mgmt=WPA-EAP
    eap=TTLS
    # path to the downloaded CA certificate
    ca_cert="/etc/ssl/certs/Hellenic_Academic_and_Research_Institutions_RootCA_2015.pem"
    domain_match="radius.sin.cvut.cz"
    phase2="auth=PAP"
    pairwise=CCMP
    group=CCMP

    # Your credentials
    identity="jiri.novak@sin.cvut.cz"
    anonymous_identity="anonymous@sin.cvut.cz"
    password="YourStr0ngPa$$word"
}
iwd
Contributed by our member Artem Poliakov (poliaart <at> fit.cvut.cz)! Thanks!
iwd is a wireless daemon for Linux which aims to utilize features provided by the Linux Kernel to the maximum extent possible. It can work in standalone mode or in combination with comprehensive network managers.
If you want to connect to Wi-Fi using iwd, you need to place file called Sincoolka.8021x or Sincoolka 5G.8021x
(depending on which network you'd like to connect) under /var/lib/iwd directory. The suggested contents can be found below.
To properly verify that you are using our server, the CA certificate is necessary. It should be already on your system at path /etc/ssl/certs/Hellenic_Academic_and_Research_Institutions_RootCA_2015.pem, so this configuration will use that. If you don't have it there, you may download it from us and save it. You will then enter the path to this file in the wpa_supplicant configuration profile.
- Sincoolka.8021x
[IPv6]
Enabled=true

[Security]
EAP-Method=TTLS
EAP-Identity=anonymous@sin.cvut.cz
EAP-TTLS-ServerDomainMask=radius.sin.cvut.cz
EAP-TTLS-CACert=/etc/ssl/certs/Hellenic_Academic_and_Research_Institutions_RootCA_2015.pem
EAP-TTLS-Phase2-Method=Tunneled-PAP
EAP-TTLS-Phase2-Identity=your.username@sin.cvut.cz
EAP-TTLS-Phase2-Password=YourStr0ngPa$$word

[Settings]
AutoConnect=true